Simulation Challenge
1 Overview of the simulation
This challenge could be solved in a natural setting where there is a male chameleon, a female chameleon and a bird as a predator.
The three agents (male, female and bird) could move around the stage and the male chameleon change color when interacting (touching or being close) with the female or the predator.
When approaching the female he would turn pinkish and when interacting with the predator it would change its color to reddish-yellow.
2 The WHY behind the simulation
The color change of the male panther chameleon is not only a fascinating phenomenon in nature, but it also offers us a window to better understand concepts of communication and adaptation. In everyday life, both humans and animals use visual cues to communicate and adapt to different situations. By observing how the panther chameleon changes its colors during courtship, confrontations with predators, and competitions with other males, students can reflect on how visual cues play a crucial role in social interaction and survival. This challenge enables us to these concepts through modeling, promoting a deeper understanding of biology and communication.
Furthermore, the simulation of color change in the panther chameleon can be a powerful metaphor for discussing issues related to adaptation and flexibility in our lives. In the educational and professional field, the ability to adapt to different situations is an invaluable skill. Just as the chameleon changes color to meet different challenges in its environment, we as individuals must also learn to adjust our behavior and strategies in response to various circumstances. This challenge invites us to think critically about how we can apply adaptation and flexibility in our daily lives, both in academic and personal contexts.
Finally, this challenge can also be connected to the technological and creative field. The ability to change and adapt is essential in fields such as design, programming and engineering. By modeling panther chameleon behavior, we can look at parallels with how algorithms and technologies must adapt to different users and conditions. This activity not only enriches your scientific understanding, but also fosters an innovative and adaptive mindset, crucial for solving complex problems in an ever-changing world.
3 Simulation Challenge Walkthrough
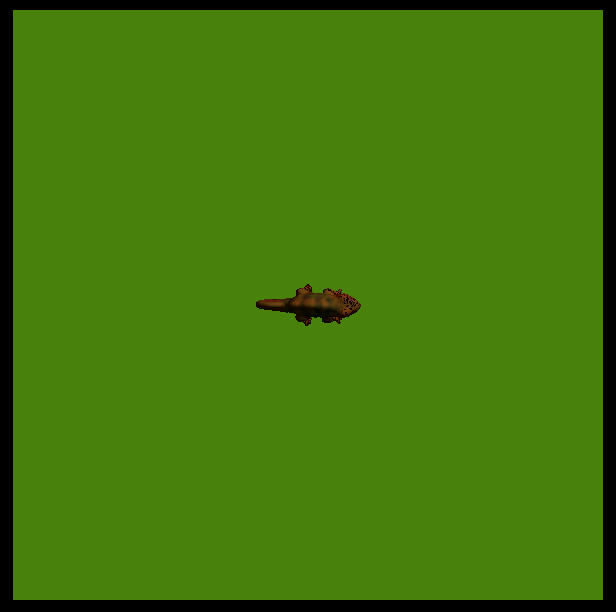
In this challenge we will first work with the internal states of the agents (their “traits”). The agents themselves, when created, have three states or traits: their shape (as if it were a costume); their color and their size.

As can be seen in the previous figure, the default values of these three states are:
-
Shape: Cube
-
Color: White
-
Size: 1
Initially we are going to create three breeds of agents: male chameleon; female chameleon; and bird (predator).
1 Create agent breeds
We will leave the scenario for this challenge as it is, but eventually trees, grass, bushes, rocks, etc. could be added. (see section “Expanding the simulation”)
-
Click on My projects → Create new project
-
Name the project. Click where it says “Title” and write there “CHAMELEON” (or whatever name you want).
-
For now we will leave the description of our model as it is by default.
-
We go to the bottom of the interface, where the “Turtle” tab appears and click on “Rename Breed”
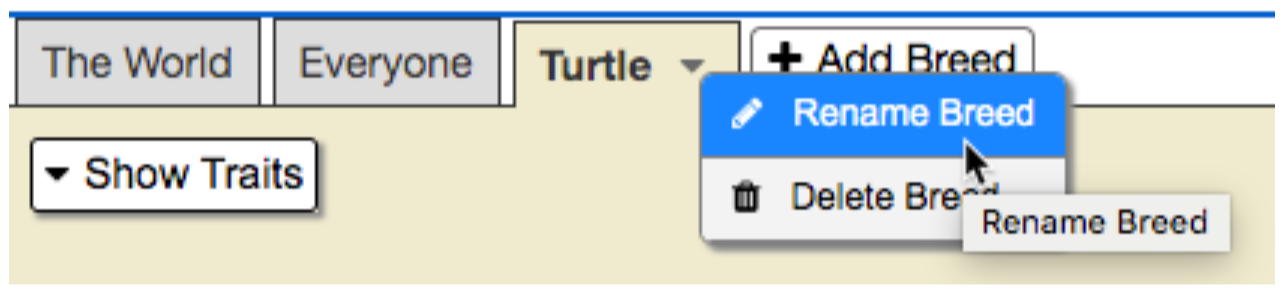
- We rename the “Turtle” breed as “Male chameleon” and we will see that the green “Run code” button appears, we click on it to turn it off.
-
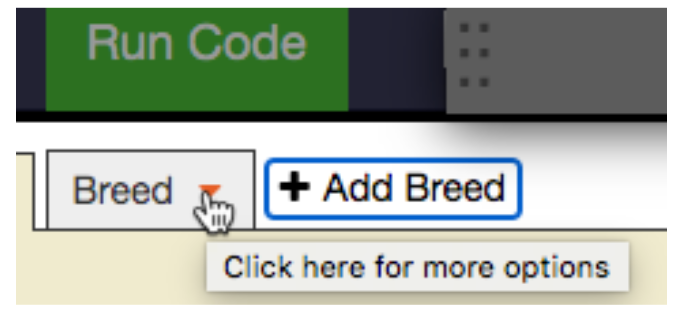
 By default, when we create a model in StarLogo NOVA, there is always the breed “Turtle”, but of course you can rename that breed (just as we have done) and also add new breeds, which is what we will do now. To add a new breed, click on the “tab” Add Breed and we will see that a new tab is added with the name “Breed”. By clicking on the orange triangle, we can rename the new breed with the name we choose. In our case, we will call it “Female Chameleon”.
 - We repeat the procedure to add the “Bird” breed and we are left with the three created breeds:

2 Create agents themselves
Although in the previous step we created the agent breeds, we have not yet created the agents themselves. This might seem a bit confusing at first, but keep reading, and the logic will become clear.
In the previous step, by creating the agent breeds, it’s as if we had created categories, but now we need to create the agents within each of those categories.
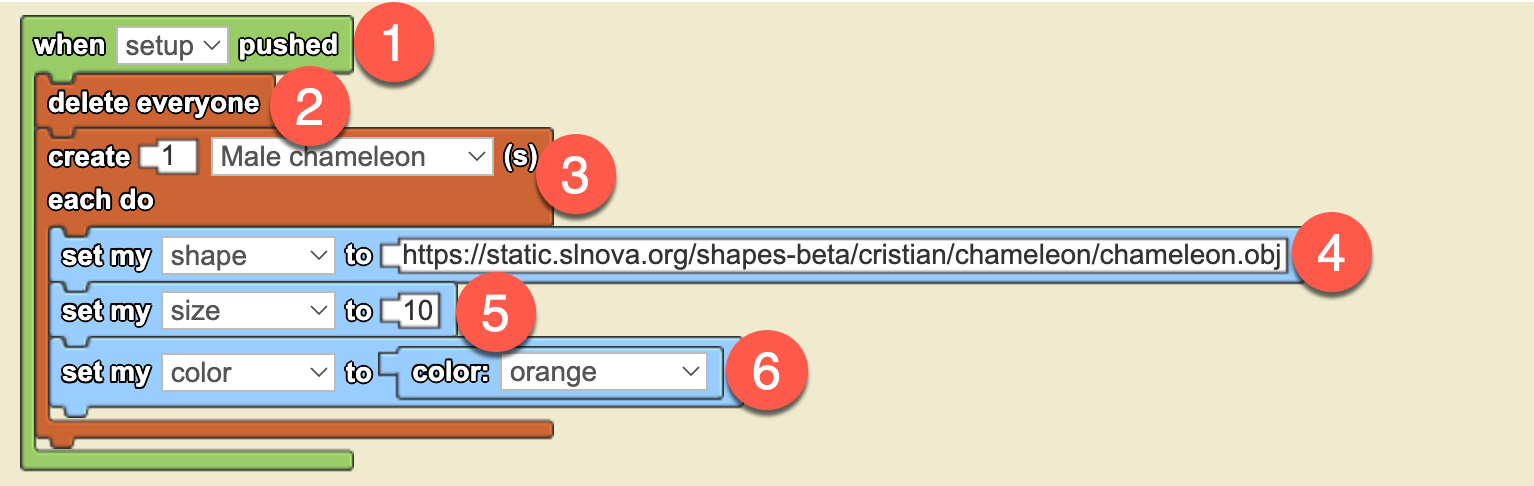
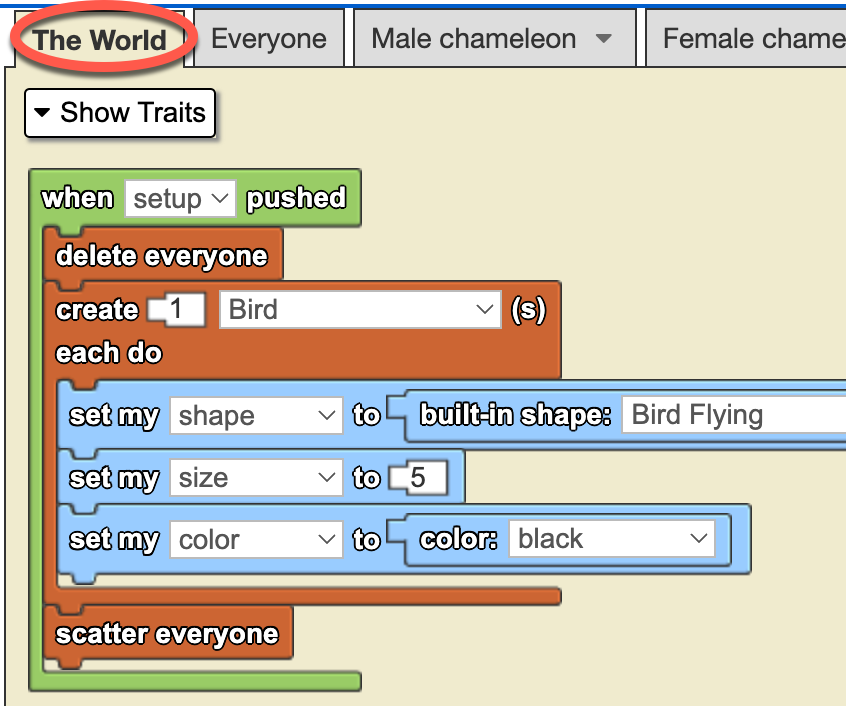
So, let’s start by creating an agent of the “Male chameleon” breed. The creation of agents, regardless of their breed, is always done in the “The World” tab following a standard procedure using the following blocks (below the image, we explain each step in the numbered order):
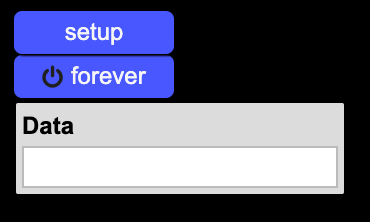
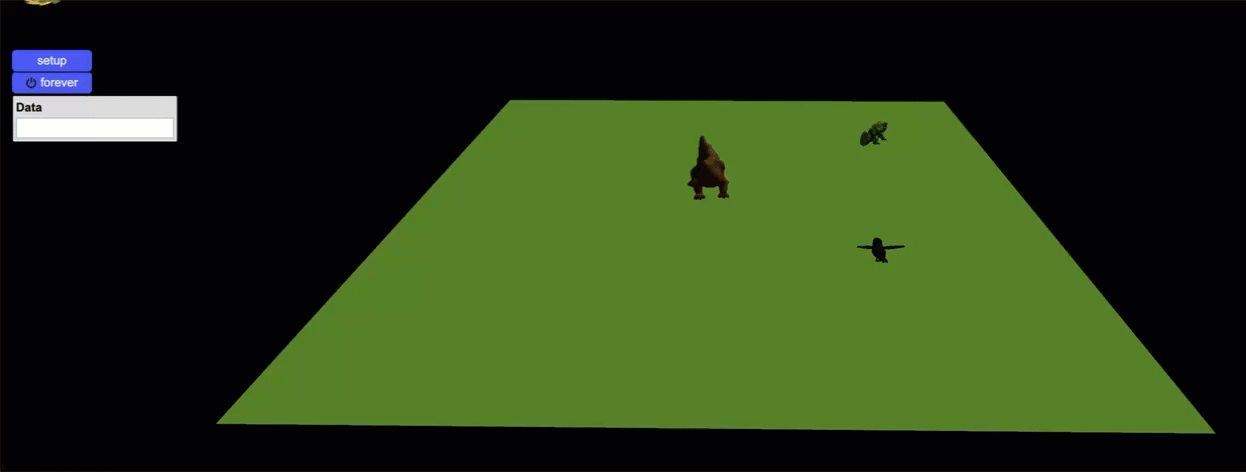
Whenever a new project is created in StarLogo NOVA, by default, two buttons are generated: setup and forever, along with a data box called data:
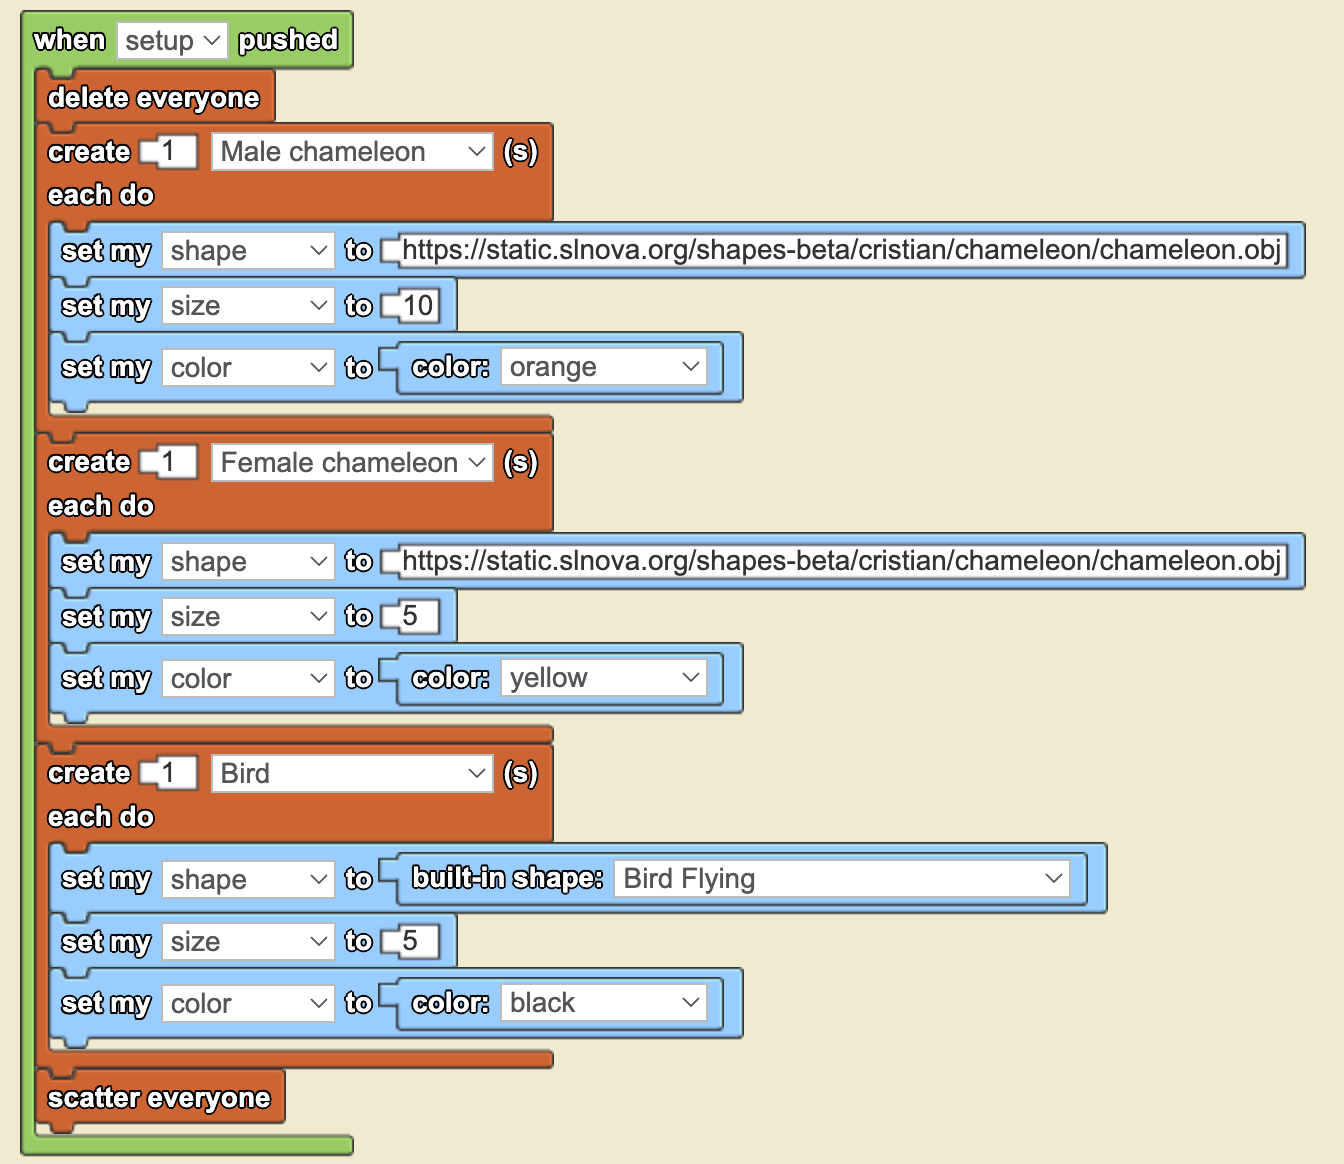
Step-by-Step Agent Creation, Block by Block
We will now go through each of the blocks that make up the sequence to create an agent and give it a different appearance from the default one (cubes, white in color, and size 1).
- That’s why the first green-colored block, which contains all the other blocks, is "when setup pushed". This means that when the user clicks the setup button, all the commands inside the green block will be executed.
- The second block is "delete everyone", which ensures that every time agents are created, the previous ones are removed. Without this block, every time we press the "setup" button, new agents would be created without deleting the previous ones.
- The third block (brown-colored) is "create ... each do ...". This block performs the magic of creating a specific number of agents from a particular breed with predetermined characteristics (different from the default characteristics that each agent has when created).
- The fourth, fifth, and sixth blocks (light blue-colored) are precisely used to give the agents a chameleon-like appearance, making them orange and size 10. I believe there’s no need to explain what each block does, as it is quite evident.
Now, let's create our male chameleon agent with an orange color, size 10, and a chameleon-like appearance. To do this, click on the blue "setup" button in Spaceland, and you will see the following:
By default, the view in Spaceland is in 2D, as if a camera were looking from above. To switch to a 3D view, click the "Edit camera" button, then right-click on the stage (the green canvas) and use the mouse scroll wheel to zoom in and rotate the scene. When the scene looks the way you like it, click the "Lock camera" button. You can experiment with this yourself, but we also show it in an animation (no sound) so you can see how it might look:
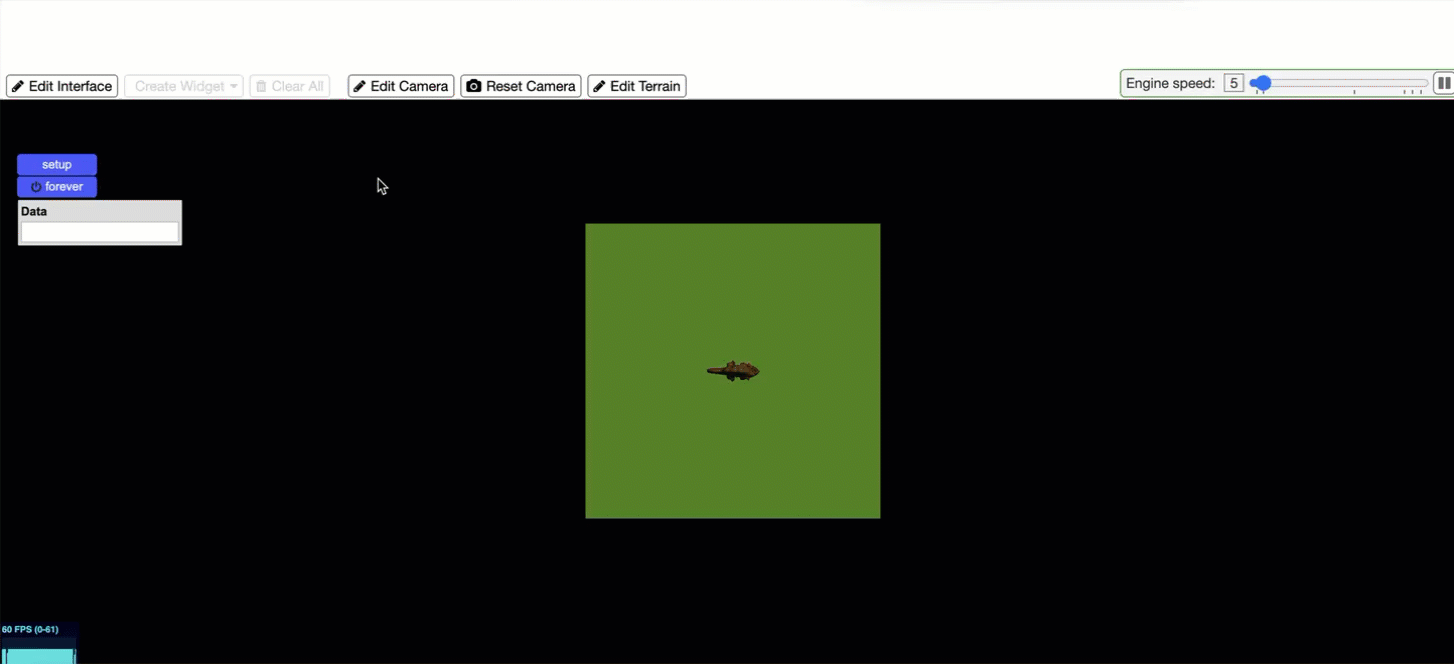 |
We now have our male panther chameleon on the stage!
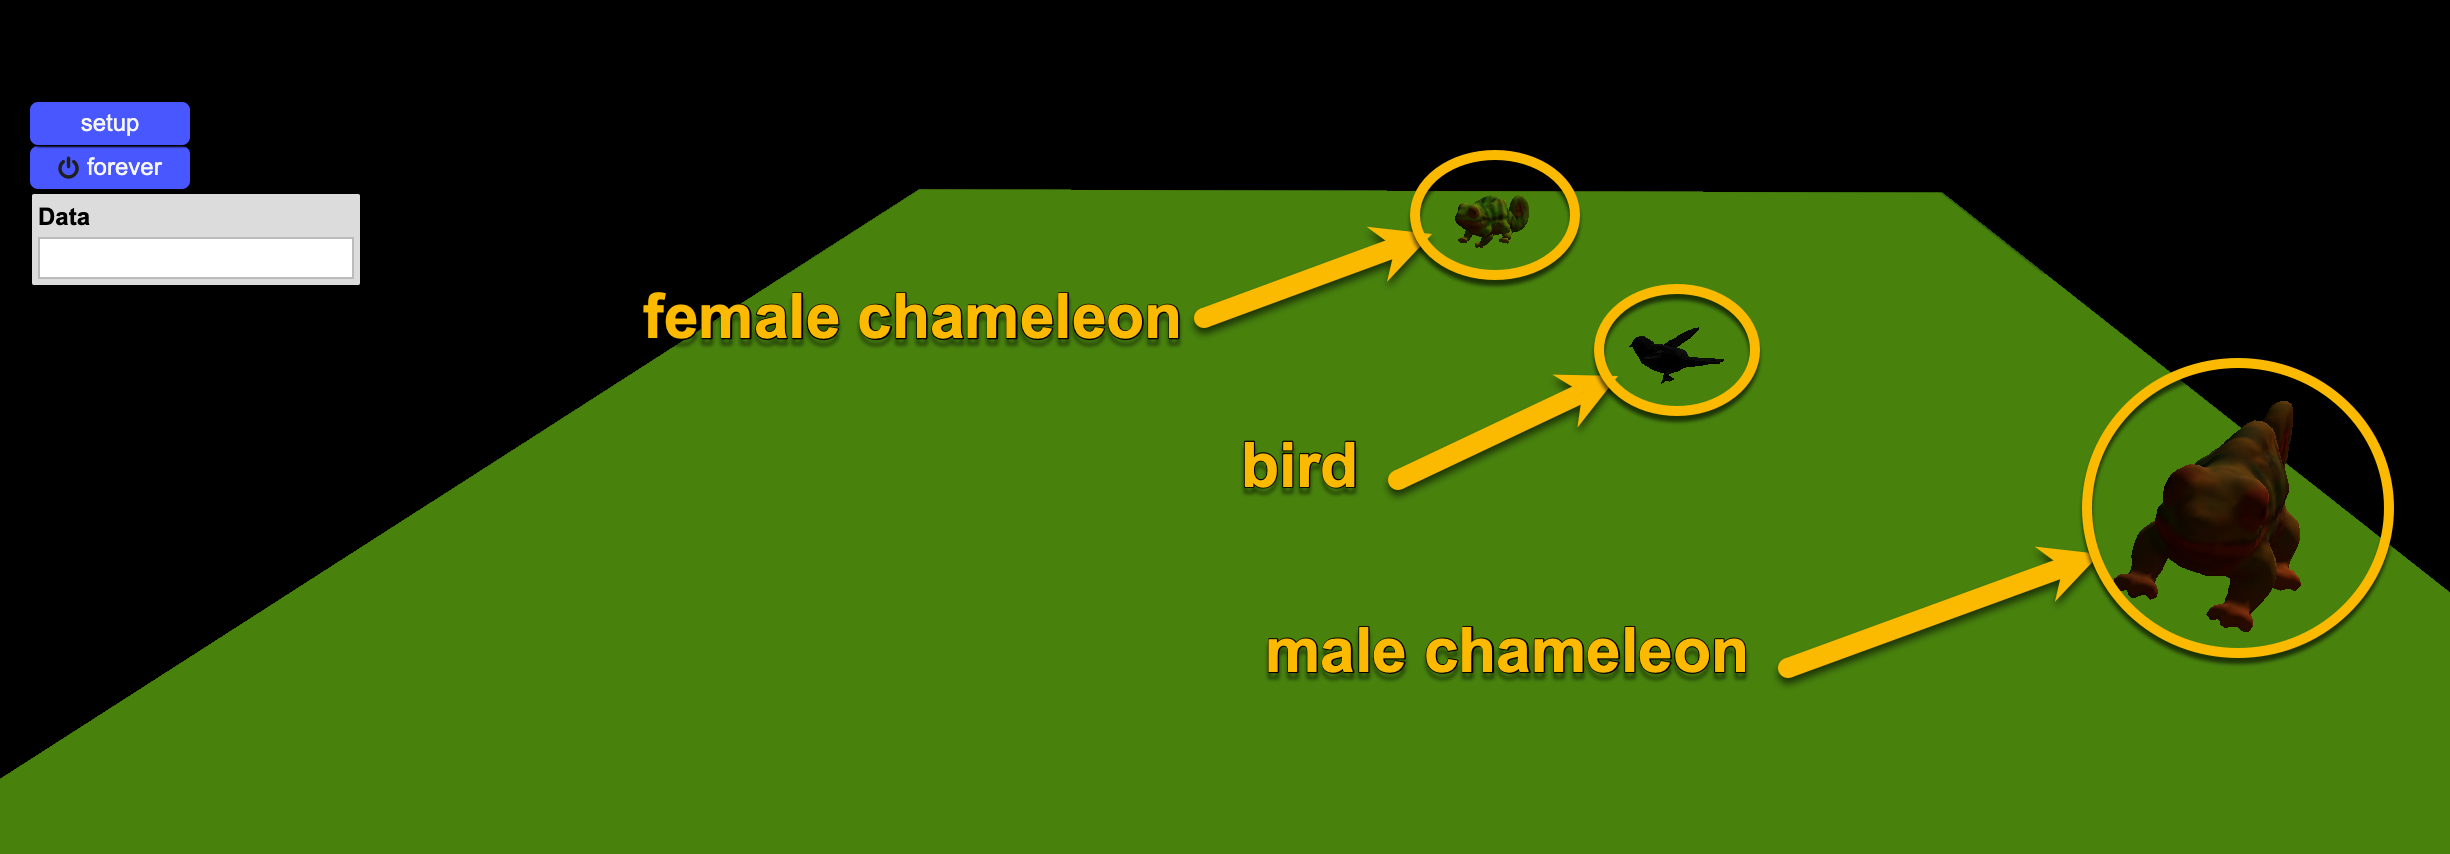
We proceed in the same way to create a female chameleon agent, which will be the one the male chameleon will court, and a bird agent, which will act as a predator. These will be the characteristics (traits in StarLogo NOVA) of both agents:
-
Female Chameleon
- Shape: Chameleon (the same as the male)
- Size: 5 (smaller than the male)
- Color: Yellow
-
Bird
- Shape: Bird flying
- Size: 5
- Color: Black
And below, we can see what the code for creating the three agents looks like:
The last block, "scatter everyone", is necessary because, by default, StarLogo NOVA always creates agents in the center of the stage (at coordinates 0,0). If we don’t scatter the agents, they will overlap, and we won’t be able to see them. You can test this code yourself by clicking the "setup" button, and you will see something like this:
Now try removing the "scatter everyone" block and clicking "setup" again to see what happens. What happened? Why is only one agent visible? Now, add the “scatter everyone” block back and click “setup” again.
Finally, before concluding this section, I’d like you to take a close look at the code: Do you notice anything unusual about the syntax of the “set my shape to” blocks?
In the case of the male and female chameleons, there is a URL (a link) with a rather long web address ending in “.obj”. However, in the case of the bird, there is no URL—just the name of a shape (“flying bird”) preceded by the term "built-in".
The reason for this is that StarLogo NOVA has many preloaded images (“built-in shapes”), but it does not include a chameleon. That’s why, in order to use a chameleon figure, we had to upload one to a specific server and reference it via a URL.
Don’t worry—you won’t have to do this yourselves! We handled this as an exception for this exercise.
3 Making the agents move around the stage
Once we have the three agents created, now we have to maken them move around. In this simulation, we will make all three agents move randomly in a similar way. We could make the bird fly, but since this is our first model with StarLogo NOVA, we will keep it moving at ground level.
RANDOM WALKS: A random walk is a simple yet powerful way to model movement in nature, where agents move in unpredictable directions at each step. This approach mimics real-world behaviors such as the foraging patterns of animals, the dispersion of pollen, or the motion of molecules in liquids. In StarLogo NOVA, using random walks allows agents to explore their environment without predefined paths, making simulations more dynamic and representative of natural systems.
In our case, for this particular model, we will use a type of random walk called “wiggle walk”.
In a wiggle walk, agents move forward while randomly turning slightly to the left and then slightly to the right at each step. The random number determining the degree of left and right turns makes them move in a zigzag pattern across the world, but always progressing forward:
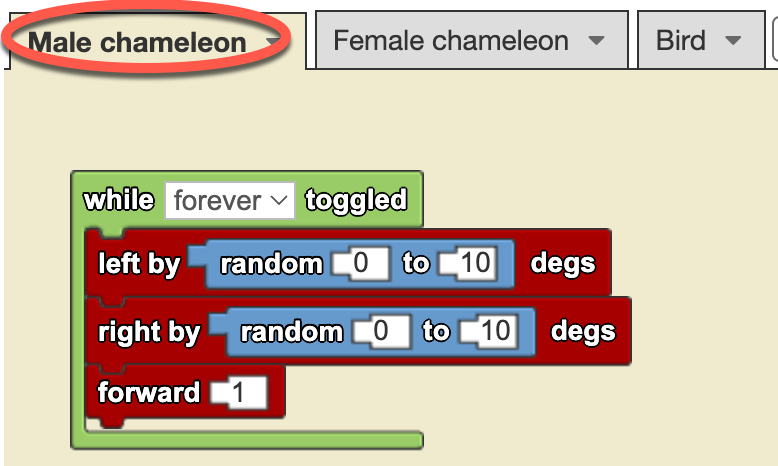
Looking at the wiggle walk code (before the gray rectangle above), you will notice that we have placed these blocks in the “Male chameleon” agent tab (see the red ellipse in the picture), whereas the previous blocks for creating agents were placed in the “The World” tab. We recommend remembering this as a kind of mantra:
| Action | Tab where to place them | Blocks to use | Sample code |
| Agent and breed creation | The World | 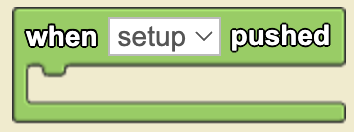 |
 |
| Agent movement | Specific of each agent breed |  |
|
Note that the left and right turns use a random number, while the forward steps are always set to 1. In this case, we have chosen this approach to simplify the model, but we could also use a random number for the number of steps the agent moves forward.
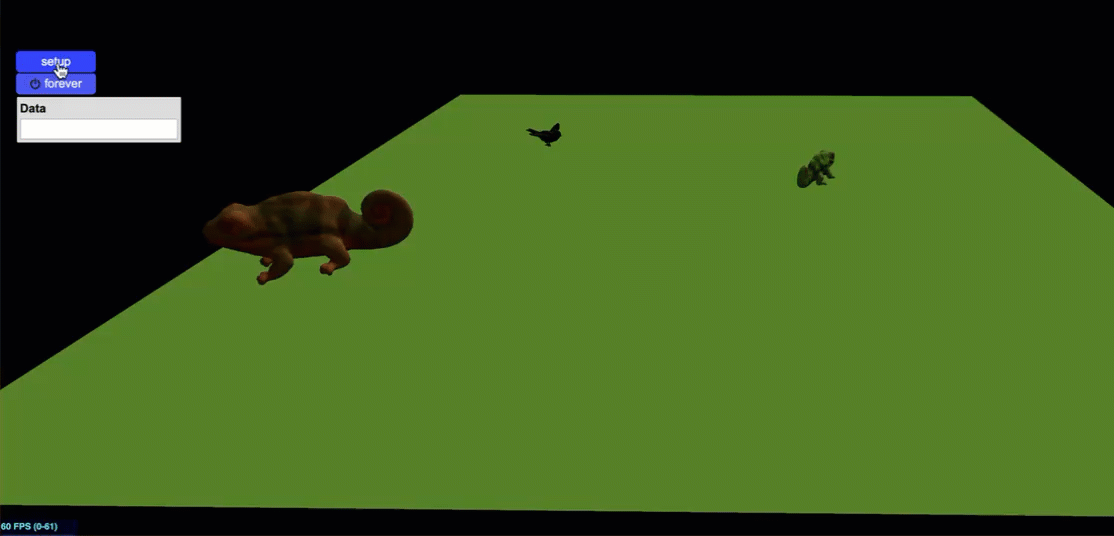
Now, by clicking the “setup” button and then clicking the “forever” button, we can see our male chameleon happily moving around the stage, while the female chameleon and the bird remain still:
To make the female chameleon and the bird move as well, we simply need to copy the wiggle walk blocks from the Male Chameleon breed tab (using right-click) and paste them into the corresponding tabs for each agent, as shown in the video below (no sound):
Now, all of our agents are scattered across the stage, moving randomly! (see animation below)
Our next challenge is to program interactions between the agents so that the male chameleon reacts differently when encountering the female and when facing the predator.
4 Agent interactions
Now is the time to program the agent interactions as required by the challenge:
The three agents (male, female and bird) could move around the stage and the male chameleon change color when interacting (touching or being close) with the female or the predator.
When approaching the female he would turn pinkish and when interacting with the predator it would change its color to reddish-yellow.
We need to be more specific about our goals, so we will summarize them in a table.
| SOURCE AGENT | INTERACTION | TARGET AGENT | RESULT |
|
Male chameleon |
Approaching within a 10-step radius | Female chameleon | Change the color to pink |
| Interact by touching or bumping | Predator | Change the color to yellow |
Note that the difference between touching and bumping into is subtle: touching occurs when one agent makes slight contact with another, while bumping implies a collision between agents. In both cases, the interaction involves agents making physical contact.
In StarLogo NOVA, collisions play a central role because we are working within an agent-based simulation environment, where interactions are fundamental. Within this specific context, StarLogo NOVA follows a particular approach: suppose we want to program the second interaction depicted in the table above, where the male chameleon bumps into the bird. If we define this interaction between the predator (agent1) and the male chameleon (agent2), and place the blocks inside the agent1 (the bird) tab, then agent1 is considered the collider, while agent2 (the chameleon) is the collidee.
The best way to illustrate this crucial concept is by displaying the exact blocks used to program this interaction:
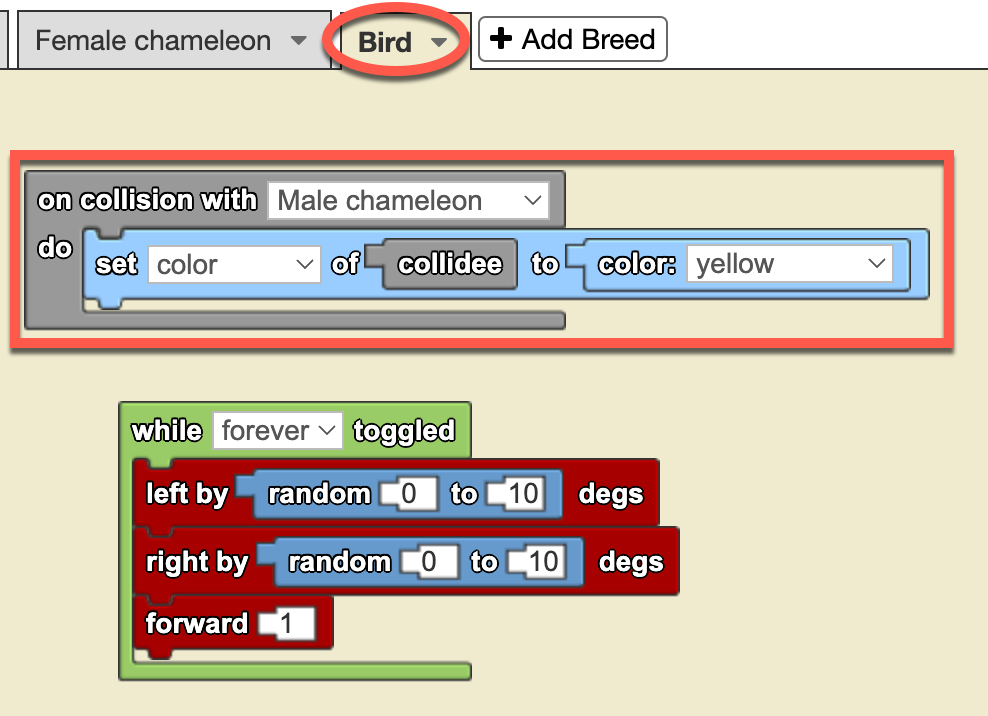
In the image on the left, you can see the block-based programming for detecting collisions between agents. Notice that the blocks are placed in the Bird tab, which means the Bird is the “collider”, while the Male Chameleon is the “collidee”.
We could have just as easily programmed the interaction in the Male Chameleon agent’s tab instead. However, in that case, the code blocks would be analogous but slightly different.
Take a moment to think about this. At the end of the challenge, when you access the full model, try deleting this code from the Bird tab and reprogramming the blocks in the Male Chameleon tab to see if you can achieve the same effect.
That is one of the great advantages (and joys) of experimenting with computational simulations: we can test our models by modifying the code and seeing what happens—without breaking any Erlenmeyer flasks, test tubes, or beakers.
Now that we have the code set up so that when the Male Chameleon collides with the Bird agent, the chameleon changes its color to yellow, let’s test it by clicking the setup button and then the forever button.
Note that before running the simulation, we have increased the chameleon’s speed to 3 steps forward instead of 1 to give it a higher chance of interacting.
Since the agents turn randomly to the left and right, we cannot predict exactly when a collision will occur—or if it will happen at all. You might be wondering if it’s possible to program specific actions where a predator actively chases its prey. The answer is “yes, definitely!” And also program the prey to evade the predator!
We will explore this particular cases in one of the simulations in the upcoming chapters.
Now we need to program the interaction between the Male Chameleon and the Female Chameleon as part of the courtship.
In this case, we want the Male Chameleon to turn pink when the Female Chameleon comes within a radius of 10 steps, without touching him yet. Just as we programmed the previous interaction from the tab of the agent that was not affected (the bird), this time we will see how to do it from the tab of the agent that will change its appearance (the male chameleon). So let's do it:
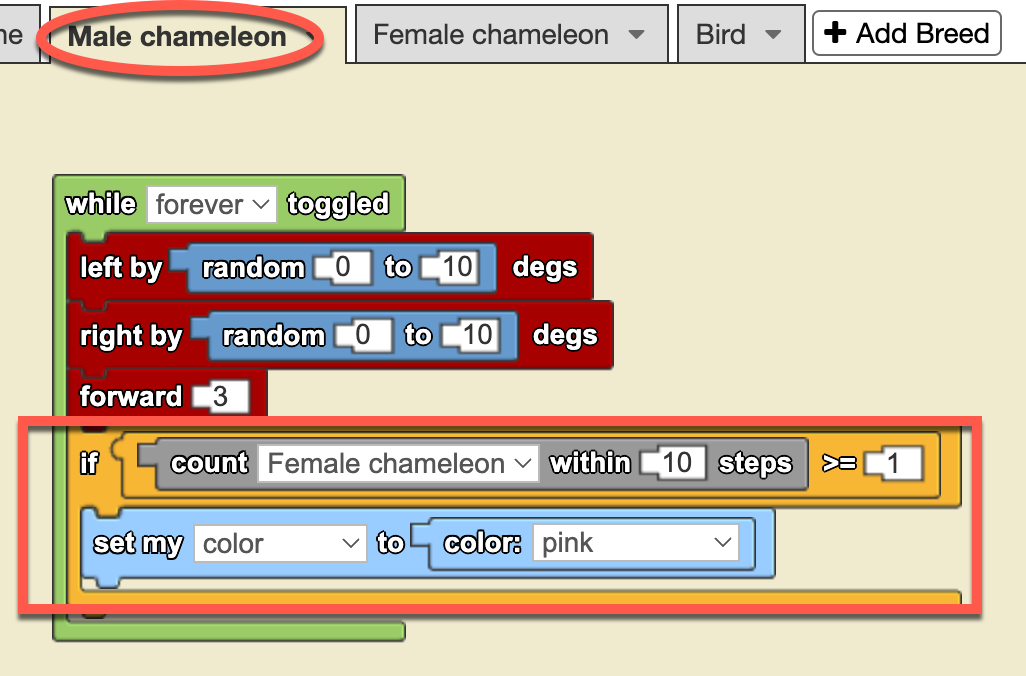
In this case, we are introducing a new programming structure: the yellow conditional block “IF…”.
This structure evaluates whether a condition is true or false and executes a series of actions based on the blocks contained within it. If the condition is true, the actions inside the IF block will be executed; if not, they will be skipped.
The condition we are evaluating here is whether or not there are any female chameleons within a radius of 10 steps. The gray block “count … within — steps” performs this operation: it counts the number of agents of the chosen breed within a given range.
In our model, there is only ONE female chameleon, but the same code will also work if there are multiple. With that in mind, the red squared command block checks if there is at least one female chameleon within a 10-step radius. If the condition is true, the male chameleon’s color changes to pink; otherwise, nothing happens.
Now, let’s watch this animation to see how the code works in practice:
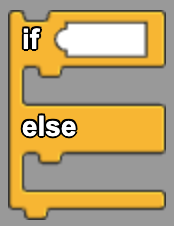
In addition to the IF… structure, there is a complementary structure called IF… ELSE..., which allows us to define an alternative action when the condition is false. Instead of simply doing nothing when the condition is not met, the ELSE part of the block provides an explicit instruction for what should happen in that case.
For example, in our chameleon model, we could extend the current rule: If there is at least one female chameleon within a 10-step radius, the male chameleon turns pink. However, what if no female chameleons are nearby? With an IF… ELSE.... structure, we could specify an alternative behavior, such as making the male chameleon turn green instead. This way, regardless of whether the condition is true or false, the program always executes an action.
With these two interactions—between the male chameleon and the female chameleon, and between the male chameleon and the bird—we have completed our very first computational model in StarLogo NOVA.
I know this might feel a bit daunting, especially if this is your first experience with agent-based, block-based programming environments. But trust me—as you progress through the upcoming challenges, you’ll start to notice that many structures and blocks follow similar patterns, and using them will become second nature.
Since this is our first computational modeling simulation, we will leave it as it is, with these two interactions, embracing the feeling of “mission accomplished!” In the upcoming chapters, we will build upon what you’ve learned here, introduce new structures, and explore additional programming and modeling concepts to tackle even more challenges.
You can explore the complet model here: [Click to access]
4 Teacher's Toolbox
This simulation opens the doors to emphasize the relationship between color change and courtship. Explain, for example, how male chameleons change color to attract females, exhibiting vibrant colors that indicate their health and vitality. Not only is this behavior an example of sexual selection, but it also offers an opportunity to discuss how organisms develop specific characteristics to increase their chances of reproduction. It can be an opportunity to encourage students to observe and record variations in color patterns during courtship and to relate them to concepts of evolutionary biology and animal behavior.
In addition, of course, to explore how color change is an evolutionary strategy against predators. Explain that chameleons have the ability to change their coloration to camouflage themselves in their environment and avoid being detected by predators such as birds of prey and owls. This phenomenon can be linked to concepts of adaptation and natural selection, highlighting how chameleons that are more efficient at camouflage are more likely to survive and reproduce. Encourage discussion about other defensive strategies in the animal kingdom and how these contribute to the survival of species. This activity can not only enrich your students' understanding of evolutionary mechanisms, but also the complexity and beauty of adaptations in nature.
5 Expanding the simulation
-
Add fixed objects to give the scene a more realistic look (StarLogo NOVA has many different tree and grass objects). Investigate what the natural settings of chameleons are like.
-
What other agents could we add to add realism to the scenario? Fixed or mobile agents? Vary agents in size and distribution.
-
Modify the scenario by stamping a part with a different color to simulate a fixed element such as a water pond with a blue ellipse. What other colors could be used and for what landscape elements?
No Comments